


Having a flat tire can be a frustrating experience, especially when you're on the road and far away from the nearest gas station or mechanic. That's where a portable cordless tire inflator comes in handy. This compact and easy-to-use device allows you to inflate your tires anytime, anywhere, without the need for a power source. In this step-by-step guide, we'll walk you through the process of using a portable cordless tire inflator to get you back on the road in no time.
Step 1: Prepare the Tire Inflator
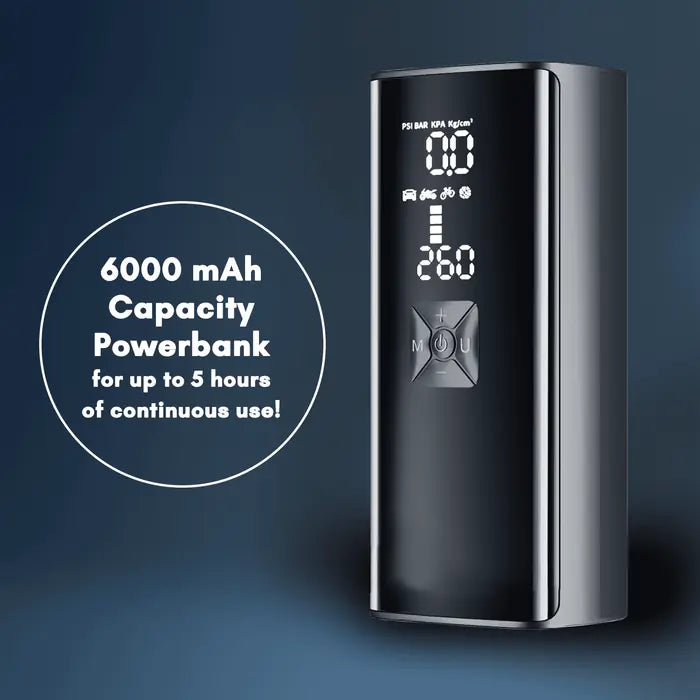
Before you begin, make sure your portable cordless tire inflator is fully charged. Most inflators come with a built-in rechargeable battery, so you'll need to connect it to a power source using the provided charging cable. Once the inflator is fully charged, disconnect it from the power source and ensure that all the necessary accessories, such as the air hose and nozzle, are securely attached.
Step 2: Check the Tire Pressure
Next, you'll want to check the current tire pressure using a tire pressure gauge. This will help you determine how much air you need to add to your tires. The recommended tire pressure can usually be found in your vehicle's owner's manual or on a sticker located on the driver's side door jamb. Once you have the desired tire pressure, take note of it for reference.
Step 3: Connect the Inflator to the Tire
Locate the valve stem on your tire and remove the valve cap. Attach the air hose of the portable cordless tire inflator to the valve stem by pressing it firmly and twisting it clockwise until it is securely in place. Make sure there are no leaks by giving it a gentle tug. If you notice any air escaping, readjust the connection until it is airtight.
Step 4: Set the Desired Tire Pressure
Most portable cordless tire inflators allow you to set the desired tire pressure before inflating. Refer to the user manual of your specific inflator to learn how to adjust the settings. Once you've set the desired tire pressure, you're ready to start inflating.
Step 5: Inflate the Tire
Turn on the portable cordless tire inflator by pressing the power button. The inflator will start pumping air into the tire. Keep an eye on the built-in pressure gauge or the digital display to monitor the tire pressure. As the pressure increases, you may hear the sound of air being pumped into the tire. Continue inflating until the desired tire pressure is reached.
Step 6: Disconnect and Check the Tire Pressure
Once the tire is fully inflated, turn off the portable cordless tire inflator and disconnect it from the valve stem. Replace the valve cap on the tire. Use a tire pressure gauge to check the tire pressure again and ensure it matches the desired pressure you set earlier. If the pressure is too high, you can release some air by pressing the valve stem with a small tool or the back of the valve cap.
Step 7: Repeat for Other Tires
If you have multiple tires that need inflating, repeat the previous steps for each tire. Remember to check the tire pressure and adjust the settings on the portable cordless tire inflator accordingly.
Step 8: Store the Inflator
Once you've finished inflating all the tires, store the portable cordless tire inflator in a safe and dry place. Make sure all the accessories are properly stored and secured. It's a good idea to keep the inflator in your vehicle for future use or emergencies.
Using a portable cordless tire inflator is a simple and convenient way to keep your tires properly inflated. By following this step-by-step guide, you can easily inflate your tires on the go, saving you time and money. Remember to always check your tire pressure regularly and inflate them to the recommended levels for optimal performance and safety.